Task templates are a powerful way to keep up with everything that you need to do for any transaction. Each new account has several existing Task Templates at your fingertips that allow you to apply multiple tasks at once with just a few clicks. These tasks can be assigned to anyone in your account, auto-figure due dates, and be associated with letter/email templates.
TABLE OF CONTENTS
Task Features

Task Types
You can select from 4 different task types: ToDo, Call, Email, & Letter. Selecting Email/Letter will allow you to link a custom email template from your account to the task.
User Assignment
You can assign the task either by selecting a specific user in your account or by a "role". It's recommended to assign tasks by role, if possible, as it provides the greatest flexibility should you need to delete a user later.
- Users
This task will be assigned to whichever user (standard or managed agent) you select from your account.
Roles
Current User: this will assign the user that applies the task template
Agent or Co-Agent: this will assign the task to the primary or co-agent assigned to the transaction.
TC/Assistant: this will assign the task to the TC/Assistant assigned to the transaction. If a TC/Assistant is not assigned to the transaction, then it will automatically be assigned to the primary agent instead.
TIP: If you assign to an agent & they are not a standard user (billable) then they will not be able to login to mark the task complete.
Parent Task
The Parent Task section lets you establish a parent/child relationship between tasks. You can choose whether the child task is visible immediately or hidden until the parent task is completed. In the next section, you can also decide if the child task’s due date should be based on the parent task’s completion date or a different referenced date.
Due Date
- No Due Date
- Formula: Use a formula to automatically calculate an adjusting due date based on a reference date.
- +/- Days: Specify the number of days before (- number) or after (+ number) the Adjustment Date.
- Date Adjustment Calculator: You can also specify how you want the +/- days value to be adjusted. In other words, is the date due "5 calendar days before the closing date" or "5 business days before the closing date"? Custom calendars are defined and customized on the Transaction Date Template page.
Application Link: Admin > Template > Transaction Date - Reference Date: The reference date is a date entry or standard date (such as list date, effective date, template start date, or closing date) that can be selected to help in your due date formula. This will help the due date of your date entry automatically reflect any changes to the reference date. In other words, if you want "X Date" to be due 5 days before the closing date & if the closing date is adjusted, then the formula will auto-reflect the change by changing the "X Date" as well.
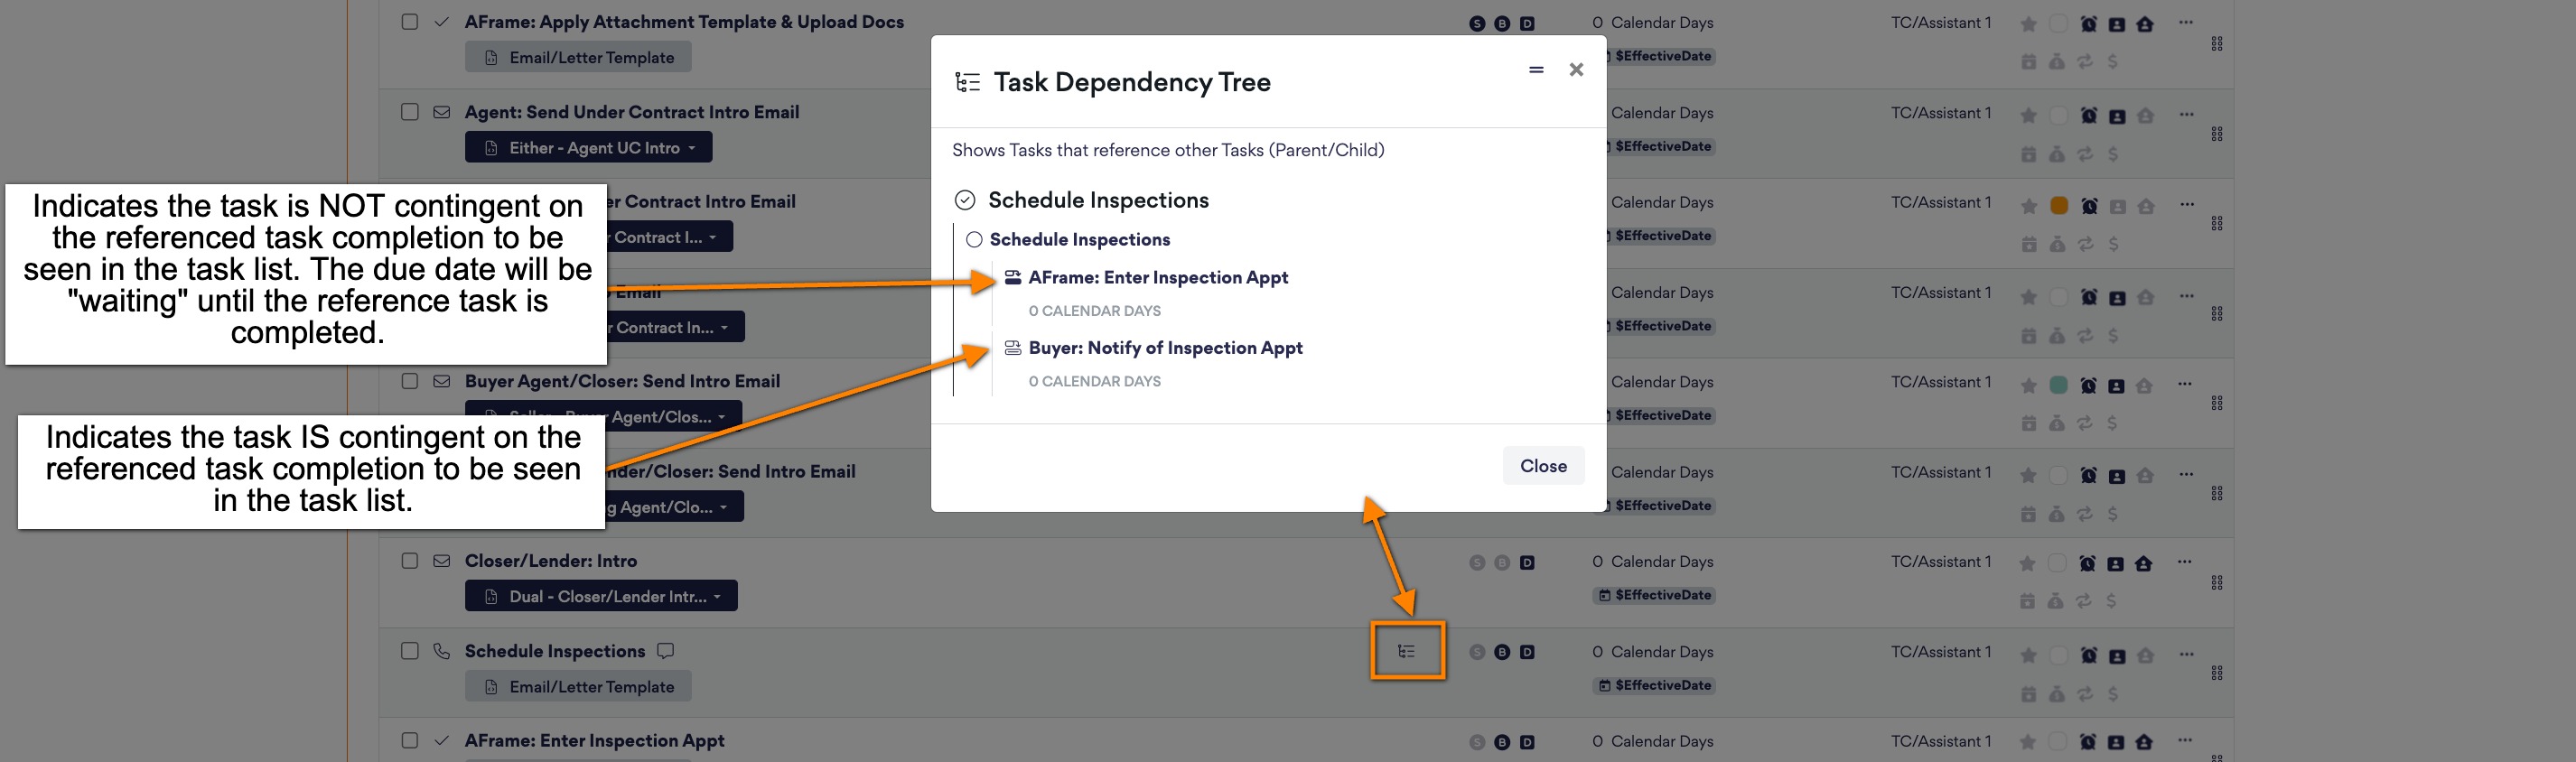
- Reference Task: The only task that can be referenced is the “Parent Task” in the reference dropdown menu. This ties the current task as a child task to the task marked as the parent in the section above. Additionally, you can create a due date formula for the child task to be calculated based on the parent task’s completion date. This setup ensures tasks are properly linked and dependent on the completion of the parent task.
You can check your task dependency tree by selecting the reference tree icon. You will then be able to visually indicate if the tasks are contingent on the reference task completion to be seen in the task list.
- +/- Days: Specify the number of days before (- number) or after (+ number) the Adjustment Date.
You can learn more by watching our explaination video here.
Reminder
Checking off the reminders box will send reminders to the managed agent and TC assigned to the transaction. The reminder will be sent at the time selected & will go to the managed agent/TC's preferred reminder notification choices selected in their accounts. The two options for reminder notifications are: email and text. The reminder selections can be changed under Admin > Team Members > Reminders.
Reoccurrence
You have the option to set the task to recur daily, weekly, monthly, or yearly. This option is beneficial when creating a task template to be used with contacts outside of a transaction. Setting up recurring tasks to keep you on task for checking in on leads, follow-up tasks after a transaction, and much more.
Application
To help reduce the number of templates you need to create, you have the ability to specify which template entries should be applied based on the transaction side: seller, buyer, or dual-sided. This is especially beneficial when you have dual-sided transactions, as you will not need to apply both buyer and seller templates, which often will populate duplicated entries.
For example, if you have certain tasks that are only buyer transaction tasks, then you would typically mark these tasks as Buyer and Dual. This will ensure that when you add the task template to either Buyer or Dual transactions, these tasks will be applied, but will not be applied to Seller transactions.
If you plan to create all-in-one task templates, then here’s how you ideally should set it up:
- Buyer Tasks: Mark as B & D so they apply only to buyer or dual-sided transactions.
- Seller Tasks: Mark as S & D so they apply only to seller or dual-sided transactions.
- Tasks for Both Sides: Mark as B, S, & D to apply them to all transactions.
You can learn more by watching our explaination video here.
Other Settings
- Milestone Task: This will place a "star" icon at the beginning of the task as a way to call out a task with more significance.
- Prospecting Task: This will place a "money bag" icon at the beginning of the task as a way to call out a task as a prospecting task. The task will also populate under your prospecting page.
Application Link: Prospect Page - Include in Calendar Feed: This will have the task populated in the assigned user's calendar feed
Visibility
You can control the task entry's visibility on the managed agent and buyer/seller portals by simply toggling it on or off.
Colors
You can customize color codes for each entry in the task templates. This helps in visually organizing and differentiating various tasks within the template. Customizing colors for each entry can streamline managing and tracking transaction tasks, providing a more visually intuitive way to stay organized.
Creating A Task Template
- Under Templates, open the task template view. Select + & then select Task Template.

Application Link: Admin > Templates > Task - Name your task template & select your internal organizational folder. Optional: add a description to summarize the task template & change the folder name it is saved under in the transaction. You also have the option to create a task template to be used with either transactions or contacts.

- Click + to add a new task entry

- Fill out the task type, name, assign user, manual/formula due date, reminder, & portal visibilities.
- You can add up to 5 email templates to each task to choose from at the time of task completion
If you want to learn more about the task tab under the transaction, then check out our Task Tab article.